Leftover chicken tenders are a trap. The microwave turns the breading to wet cardboard and the meat to rubber. The oven works but takes fifteen minutes to preheat plus another ten to heat three tenders. The air fryer fixes both problems: it crisps the breading back to fresh-fried texture and warms the meat through in four or five minutes, with no preheat required for most models. If you have a box of last night’s tenders, restaurant strips from Raising Cane’s, or a stash of cooked tenders in the freezer, this is the only reheating method worth using.
The catch is that reheating is not the same as cooking. The meat is already cooked through, so your only jobs are to bring it back to a safe serving temperature and to re-crisp the coating without drying out the inside. Push too hard and you get a hot, crunchy, leathery tender. This guide gives you the right time and temperature for every starting state, the food-safety number that actually matters, and the small moves that keep the meat juicy.
If you have ever pulled tenders out of the microwave and bitten into a soggy, steamy disappointment, you already know the problem the air fryer solves. The microwave is fast but it is the worst possible tool for anything with a crust. The air fryer is nearly as fast and it does the one thing the microwave cannot: it restores texture. Five minutes of dry, circulating heat undoes most of what storage did to the breading, which is the whole reason this method has become the standard way to bring fried food back to life.
The short answer: time and temperature

Reheat refrigerated chicken tenders at 350F for 3 to 4 minutes, flipping once halfway. That setting is gentle enough to avoid drying the meat while still crisping the breading. Thicker tenders, frozen leftovers, and restaurant strips each need a small adjustment. Here is the full table.
The pattern to remember: 350F is your reheating temperature across the board. You only change the time, not the heat. A higher temperature would crisp the outside faster but would dry and toughen meat that is already cooked. Low and steady wins when you are warming something through rather than cooking it from raw.
Frozen cooked leftovers are the one case that takes real patience. They need 6 to 8 minutes because the air fryer has to thaw the meat and bring it up to a safe serving temperature in the same pass. Do not raise the heat to rush it; you will scorch the breading while the center is still cold. If a thick frozen tender is still cool in the middle after 8 minutes, add a minute or two and check again with a thermometer.
Step by step
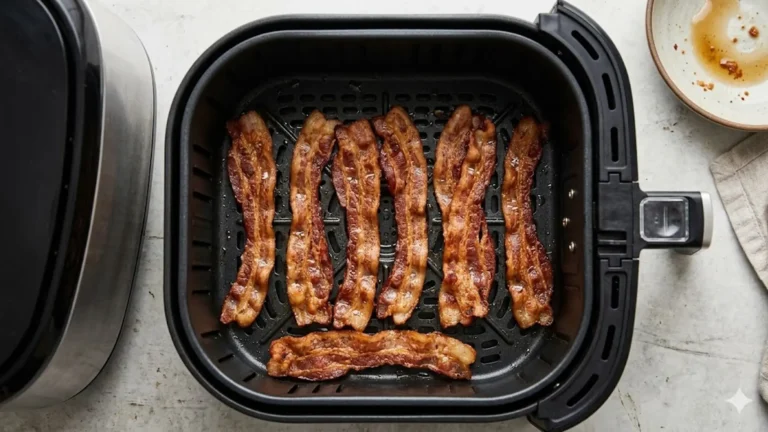
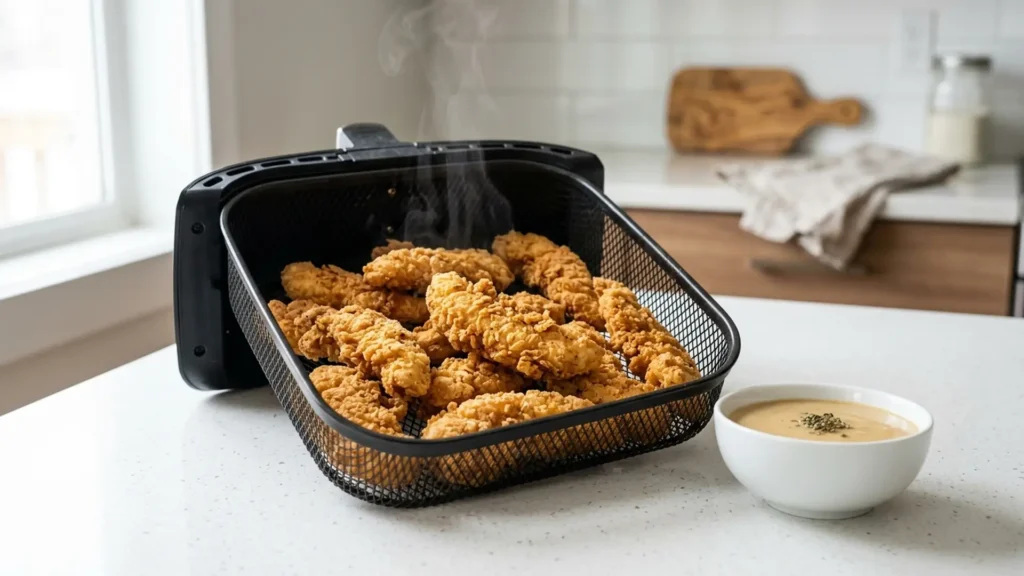
- Arrange in a single layer with a little space between each tender. Overlapping pieces trap steam, which is exactly what turns breading soggy. If you have a lot, reheat in two batches.
- Set the air fryer to 350F and the time from the table. No oil spray is needed; the breading already has enough fat from the original fry.
- Flip at the halfway point. A single flip exposes both faces to the airflow and gives you even crisping top and bottom.
- Check the internal temperature at the end with an instant-read thermometer. You are looking for 165F in the thickest tender. This is the only number that tells you the food is safe.
- Rest 1 minute before serving so the heat evens out and the breading sets back to crisp.
If your tenders were freshly cooked in the air fryer to begin with, this reheating routine is just a shorter version of the original cook. Our guide on how long to cook chicken tenders covers the from-raw timings if you are starting from scratch rather than reheating.
Why the air fryer is the best reheating tool for tenders
It helps to understand why the air fryer works so well here, because the reason tells you how to use it. Fried chicken tenders lose their appeal in storage for two reasons: the breading absorbs moisture and goes soft, and the fat in the coating congeals. A microwave makes both worse. It heats by exciting water molecules, which drives even more moisture into the breading and steams it into mush, while doing nothing to re-render the fat. The result is a hot, wet, sad tender.
The air fryer attacks both problems directly. Its dry, fast-moving hot air pulls surface moisture off the breading rather than driving it in, so the coating dries and crisps back toward its fried texture. At the same time, the heat gently re-renders the fat in the crust, restoring some of that just-fried snap. Because the chamber is small and the airflow is aggressive, it does all this in a few minutes without the long, drying exposure an oven would require. In short, the air fryer reverses the exact damage that storage does to a fried tender, which is why nothing else comes close.
This same logic is why the air fryer is the default tool across the whole reheating category, from fries to pizza to fried chicken. Anything with a crust that you want to bring back to crisp belongs in the air fryer, not the microwave.
Storing tenders so they reheat well
How you store leftover tenders decides how well they reheat. The enemy is trapped steam. If you seal hot tenders in an airtight container straight off the plate, they steam themselves soft as they cool, and no amount of air frying fully recovers that texture. Let them cool to room temperature first, but not for more than two hours, then store them.
- For the fridge: line a container with a paper towel to absorb condensation, lay the tenders in a single layer if you can, and refrigerate for up to three to four days.
- For the freezer: freeze cooled tenders in a single layer on a tray first, then transfer to a freezer bag once solid. This keeps them from freezing into one clump and lets you reheat just a few at a time.
- Avoid sauced tenders for storage. If a tender is already tossed in buffalo or honey sauce, the coating is saturated and will never crisp back up. Store the sauce separately and toss after reheating.
Tenders stored this way reheat almost as well as fresh, because you have minimized the moisture damage before it starts. The air fryer handles the rest.
The food-safety number that matters

Reheating cooked poultry is not just about taste. Chicken that has been cooked, cooled, and stored needs to come back up to a safe internal temperature to kill any bacteria that grew during storage. The target is the same one the USDA publishes for poultry.
The single most reliable tool here is an instant-read thermometer, not the clock. Tender thickness varies wildly between brands and restaurants, so two batches at the same time can land at different internal temperatures. Probe the thickest piece, confirm 165F, and you are done. The USDA safe minimum internal temperature chart lists 165F for all poultry and for reheating leftovers, which is why it shows up in both columns of the safety table above.
One more storage rule: do not leave cooked tenders out at room temperature for more than two hours before refrigerating, and use refrigerated leftovers within three to four days. The air fryer can re-crisp a tender, but it cannot undo spoilage. When in doubt, throw it out. For a plain-language rundown of safe cooking and reheating temperatures across different meats, this meat temperature guide is a handy reference to keep alongside a thermometer.
Keeping the meat juicy and the breading crisp
The whole art of reheating is hitting safe temperature without overshooting. A few habits make the difference between a tender that tastes freshly fried and one that tastes like a chew toy.
- Take them out of the fridge 10 minutes early. Letting the chill come off means the inside warms faster and you spend less total time in the basket, which keeps the meat moist.
- Never reheat in a pile. Stacked tenders steam each other. Single layer, gaps between, every time.
- Stop at 165F, not past it. Once the thickest piece hits 165F the food is safe and any extra time only dries it out. Pull immediately.
- Skip the oil for breaded tenders. They already carry fat from the original fry. Adding oil makes the coating greasy rather than crisp.
- Crowd control beats heat. If your tenders are not crisping, the fix is fewer pieces in the basket, not a higher temperature.
Restaurant tenders, frozen tenders, and homemade
Restaurant strips from Cane’s, Popeyes, or Chick-fil-A reheat beautifully at 350F for 4 to 5 minutes. They are usually thicker and more heavily breaded than homemade, so they take slightly longer than fridge leftovers but respond well to the air fryer’s dry heat, which revives that craggy coating. Frozen cooked tenders, whether store-bought or your own batch-cooked stash, need the full 6 to 8 minutes to thaw and heat through. Homemade breaded tenders that you cooked earlier in the week sit in the middle at 4 to 5 minutes.
The air fryer’s talent for reviving fried food is not limited to tenders. The same dry, circulating heat is what makes it the best tool for leftover fried chicken, too. If you have a different cut to deal with, our guide on reheating fried chicken in the air fryer walks through bone-in pieces, which need a longer, gentler approach than boneless strips.
Batch cooking and meal prep with tenders
The reason reheating tenders well is worth mastering is that tenders are one of the best proteins to batch cook. Make a big tray on Sunday, store them properly, and you have a week of fast lunches and dinners that the air fryer can revive in minutes. Cook a double batch, cool them, and split the stash: some in the fridge for the next three days, the rest frozen in a single layer for later in the week. When you want them, you already know the drill, 350F and a few minutes, and they come back crisp.
This is where the freezer method earns its keep. Because you froze the tenders spread out on a tray before bagging them, you can pull exactly the number you need and reheat just those, instead of thawing the whole batch. Three frozen tenders go from freezer to plate in 6 to 8 minutes with no planning ahead. That on-demand quality is what makes batch-cooked tenders so much more useful than most meal-prep proteins, which tend to dry out or go rubbery on reheat. The air fryer keeps them genuinely good.
If you are prepping for a household with different needs, tenders flex easily. They are naturally high in protein and, served without heavy sauces, fit a range of eating styles. Pair the crisp protein with whatever sides each person wants and you have one cook covering several meals.
What to serve with reheated tenders
Dipping sauces are half the fun of tenders, and they keep just as well as the meat. Warm a small bowl of honey mustard, barbecue, ranch, or buffalo sauce while the tenders crisp, and you have a complete plate in five minutes. Keep sauces on the side rather than tossing the tenders in them, because a sauced coating goes soft and will not crisp on reheat. Toss after the tenders come out of the basket, not before.
Reheated tenders make a fast meal when you round them out with a quick side. Crisp them while you warm a dipping sauce, then build a plate. They pair naturally with a bowl of soup on a cold night, so a pot of chicken soup turns leftovers into a real dinner. If you are counting carbs, lean tenders work inside a low-carb plan; a side from a keto snacks lineup keeps the meal in range without much effort. The tenders are the easy part; the air fryer hands them back to you crisp in five minutes.
How reheating tenders compares to other methods
It is worth a quick side-by-side, because the differences are stark. The microwave is the fastest at about a minute, but it ruins the texture, leaving soggy breading and rubbery meat, so it should be your last resort. A conventional oven gets the texture right but is slow: ten minutes to preheat plus eight to twelve to reheat, which is a lot of waiting for a few tenders, and the long exposure can dry the meat. A skillet can re-crisp the bottom but leaves the top steamy and requires added oil and active flipping. The air fryer is the only method that is both fast and faithful to the original texture, reheating crisp tenders in four to five minutes with no preheat and no added fat.
That combination, speed plus restored crunch, is why the air fryer has quietly become the go-to appliance for leftovers of any fried or breaded food. Once you have reheated tenders in it a few times, you will reach for it automatically over the microwave, and your leftovers will taste like a fresh meal instead of a compromise.
Common mistakes and quick fixes
- Rubbery, tough meat: reheated too long or too hot. Drop to 350F and pull at 165F, no later.
- Soggy breading: tenders were piled or overlapping. Single layer with gaps.
- Cold center, hot outside: frozen tenders rushed at high heat. Use 350F and give them the full 6 to 8 minutes.
- Dry on the outside, fine inside: you added oil to already-fried breading. Reheat dry next time.
Frequently Asked Questions
What temperature do you reheat chicken tenders in an air fryer?
350F is the right reheating temperature for all chicken tenders. Refrigerated leftovers need 3 to 4 minutes, restaurant strips 4 to 5 minutes, and frozen cooked tenders 6 to 8 minutes. Keep the temperature steady and only change the time.
Can you reheat frozen cooked chicken tenders in the air fryer?
Yes. Place them in a single layer and reheat at 350F for 6 to 8 minutes, flipping halfway. They take longer than fridge leftovers because the air fryer has to thaw and warm them in one pass. Confirm 165F in the center before serving.
How do I keep reheated tenders from drying out?
Use 350F rather than a higher heat, take the tenders out of the fridge 10 minutes early, and pull them the moment the thickest piece reaches 165F. Overshooting that temperature is what dries cooked chicken.
Do I need to add oil when reheating tenders?
No. Breaded tenders already carry fat from the original fry, so adding oil makes the coating greasy instead of crisp. Reheat them dry in a single layer for the best texture.